How to Disable Driver Signature Enforcement in Windows 7, 8 and 10
Windows Driver signature enforcement is that special feature built-in with every Windows 7, Windows 8.0, Windows 8.1, Windows 10 which prevent any Unsigned driver as Microsoft enforces a “Digital Signature Requirement” on all users of 64 bit version of Windows. This comes handy when you needed it most after all the frustration dealing with it and run it flawlessly and away with your task. To install less-than-official drivers, old unsigned drivers, or drivers you’re developing yourself, you’ll need to disable driver signature enforcement. Most of the android developer compile some driver toolkit to modify your phone very easily. Those drivers are not official and they do not have a digital signature. So whenever you want to install those unsigned driver, Your windows won't install those unsign properly. Without proper driver installation of your phone cannot be developed though PC. So in order to get those you will need to disable this feature for once.
How to Disable Driver Signature Enforcement in Windows
 |
| How to Disable Driver Signature Enforcement in Windows 7, 8 and 10 |
|
Step 1 - (Disable Driver Signature Enforcement) (Windows 7)
- Go to Start Menu and go to "All Programs", then "Accessories", right click your mouse on "Command Prompt" and "Run as administrator", as shown below —
 |
Disable Driver Signature Enforcement
|
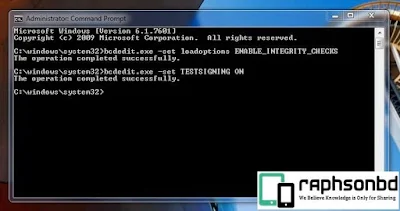
- Now type the code in cmd and hit enter — bcdedit.exe -set loadoptions DISABLE_INTEGRITY_CHECKS
- After that type the second code below and press "Enter" after each command — bcdedit.exe -set TESTSIGNING ON
 |
| Write the code and hit enter |
- Next you Reboot your PC/Laptop
- Voila This is how you Disable Driver Signature Enforcement in your windows PC.
- This will permanently disable driver signature enforcement. If you wish to disable it, than you need to follow the same procedure, just use bcdedit.exe -set TESTSIGNING OFF instead of bcdedit.exe -set TESTSIGNING ON and reboot.
Method 2 - (Disable Driver Signature Enforcement) (Windows 10) (Temporary)
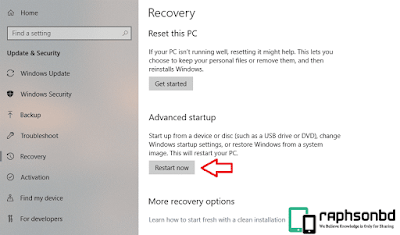
- You above method doesn't work in your windows 10, then You have to do it manually. First fo to setting > Recovery
 |
| Windows 10 Advanced Startup 'Restart' |
- Now Your PC will be reboot into windows 10 advance troubleshooter mode. Choose the "Advance Option"
 |
| Choose 'Advanced Option' |
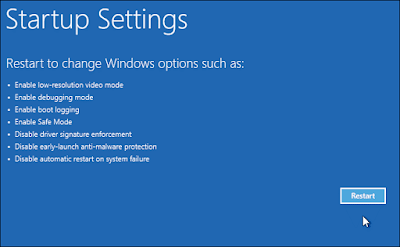
- After that press over "Startup Settings"
 |
| Go to 'Startup Settings' |
 |
| Click on 'restart' |
- Your PC will be restart in advance restart mode showing you which feature you want to use.
- Now all you have to do is to press 7 on your keyboard to disable driver signature enforcement.
 |
| Disable Driver Signature Enforcement |
- Voila. Your PC will reboot normally and the driver signature enforcement will be disable temporarily. Now you can install unsigned driver in your PC. But remember if you restart your pc, this feature (Driver Signature Enforcement) will enable again.
Related Post


4 Comments
Mr. NoBody
ReplyDeleteIf you made a video rather than writing all the things..it would be much easier to understand.
ReplyDeleteThis method only works for MediaTek device. So I think You should change the title to 'Install Custom Recovery In Mediatek Chipset based Device'
ReplyDeleteTY
MGM Resorts Inc. - Company Profile & News - Jtmhub
ReplyDeleteMGM Resorts 김포 출장샵 International 시흥 출장마사지 is a real estate 김천 출장마사지 casino developer with a global focus on delivering 포항 출장샵 exceptional, safe and secure gaming solutions. 이천 출장샵